Crispy Chocolate Mousse Brownies – Better Than Takeout
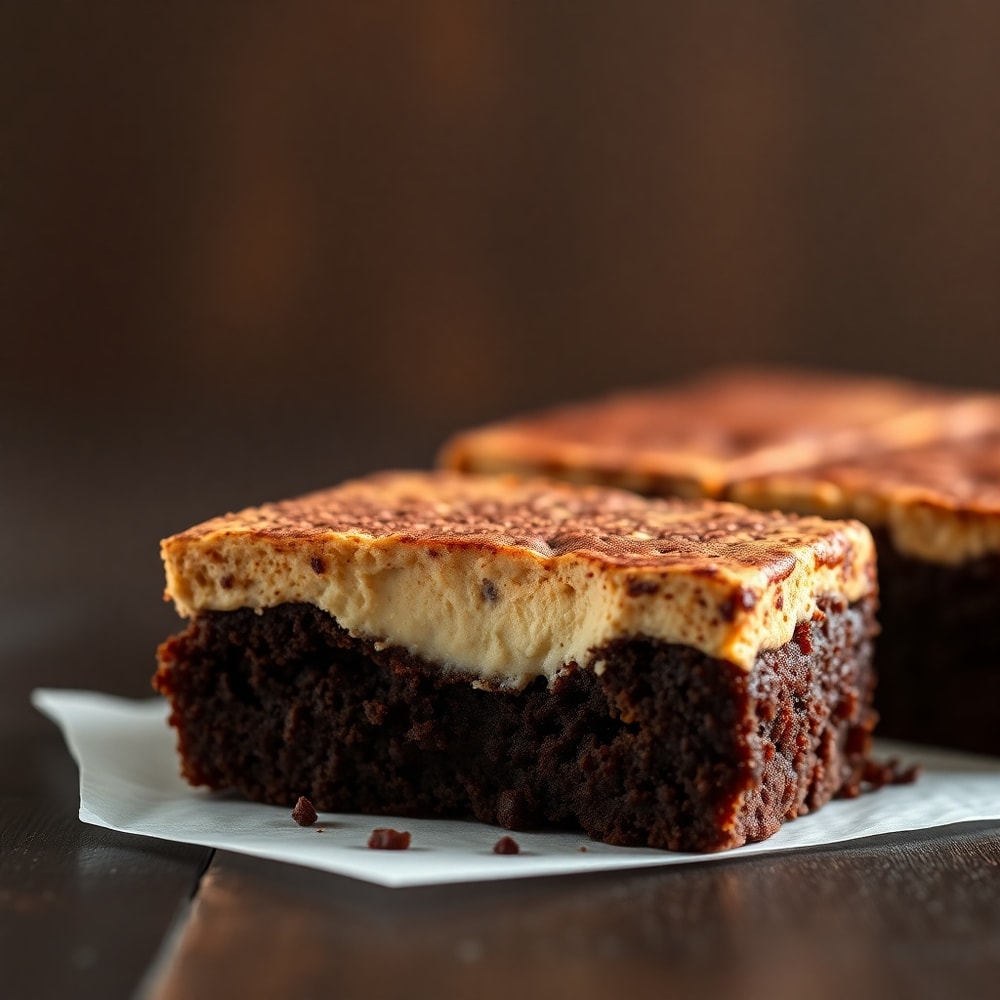
Crispy Chocolate Mousse Brownies are the ultimate indulgence, with a fudgy center and a crispy top. After making these many times, I discovered the trick to a perfect mousse topping. Keep reading for my best tips, or jump to the recipe card. If you love recipes like this, you’ll also enjoy Sheet Pan Lemon Herb Chicken and Vegetables and Crispy Cast Iron Skillet Pizza.
Why This Crispy Chocolate Mousse Brownies – Better Than Takeout Is Pure Comfort
- Fudgy center with a crispy top
- Easy to make, better than takeout
- Perfect for satisfying chocolate cravings
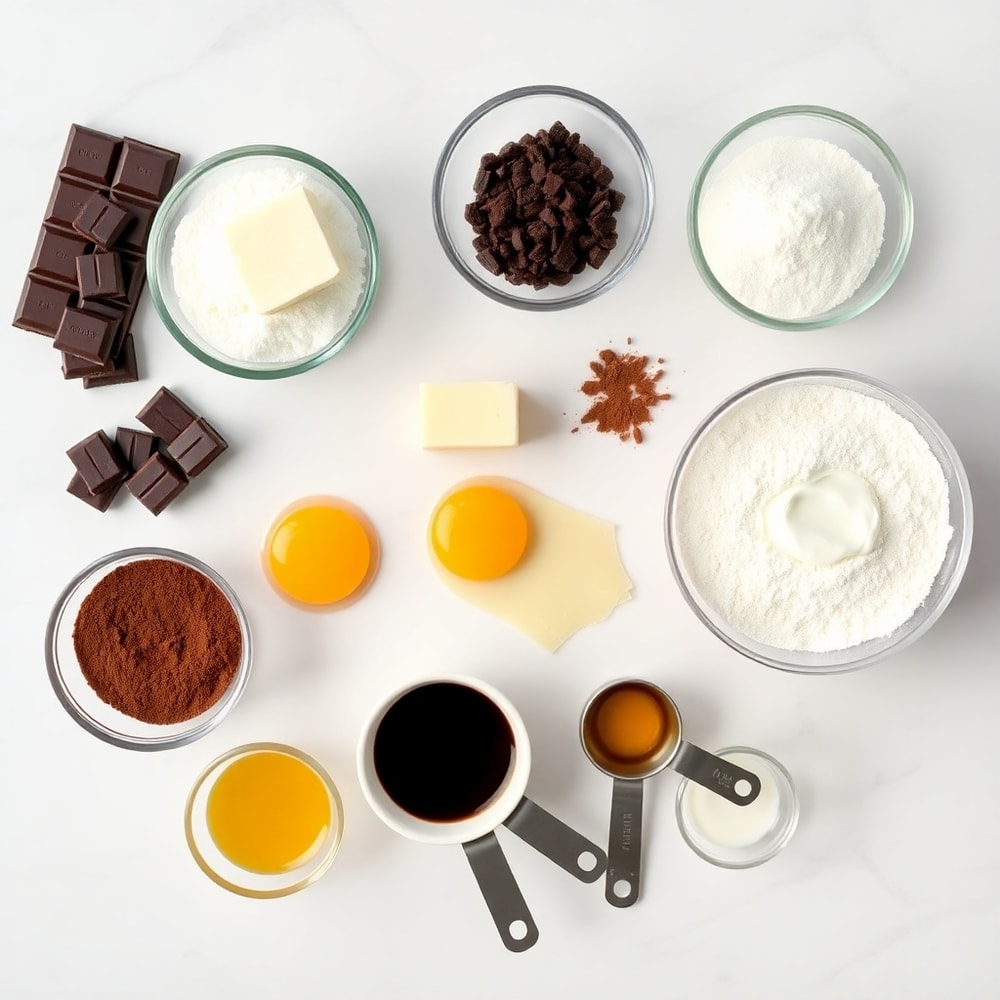
What You'll Need for Crispy Chocolate Mousse Brownies – Better Than Takeout
Choosing the right ingredients makes a big difference, but this recipe is forgiving enough to work with what you have.
- Dark chocolate
- Butter
- Sugar
- Eggs
- All-purpose flour
- Cocoa powder
- Heavy cream
- Vanilla extract
- Salt
- Vanilla extract
- Optional: Powdered sugar
- Optional: Fresh berries
📝 Ingredient Notes
- Dark chocolate: Use high-quality chocolate for the best flavor.
🛒 Tools & Equipment I Recommend
- Silicone baking mat — Prevents sticking and ensures even baking. → See on Amazon
- High-quality chocolate bar — Makes a huge difference in the final flavor. → See on Amazon

How to Make Crispy Chocolate Mousse Brownies – Better Than Takeout
- Melt chocolate and butter: In a microwave-safe bowl, combine dark chocolate and butter. Heat in 30-second intervals, stirring between each, until smooth.
- Mix dry ingredients: In a separate bowl, whisk together sugar, eggs, flour, cocoa powder, and salt.
- Combine ingredients: Add the chocolate mixture to the dry ingredients and mix until combined.
- Bake: Pour the batter into a greased 8×8-inch pan and bake at 350°F (180°C) for 20-25 minutes.
- Prepare mousse: In a separate bowl, whip heavy cream and vanilla extract until stiff peaks form. Gently fold in melted chocolate.
- Assemble: Spread the mousse over the cooled brownies and refrigerate for at least 2 hours before serving.
Cook's Tips for Perfect Crispy Chocolate Mousse Brownies – Better Than Takeout
- Common mistake and fix: Avoid overmixing the batter to prevent tough brownies. Mix just until combined.
- Tip for perfect mousse: Make sure your heavy cream is very cold for the best results.
- Storage tip: Store leftover brownies in an airtight container in the refrigerator for up to 5 days.
Storing & Reheating Crispy Chocolate Mousse Brownies – Better Than Takeout
Short-Term Storage
Store in an airtight container in the fridge. Store in an airtight container in the refrigerator for up to 5 days. Make-ahead tip: Can be made up to 1 day ahead and stored in the refrigerator.
Freezing Crispy Chocolate Mousse Brownies – Better Than Takeout
Not recommended for freezing.
How to Reheat Without Drying It Out
Oven: Not necessary, serve chilled. Microwave: Not recommended, as it may melt the mousse.
Recipe Notes
- Chef tip: For a fudgier brownie, reduce baking time to 18-20 minutes.
- Best substitution: Substitute heavy cream with full-fat canned coconut milk for a dairy-free version.
- Make-ahead: Prepare the batter and mousse separately a day ahead, then assemble and refrigerate just before serving.
- Scaling: This recipe can be doubled and baked in a 9×13-inch pan.
- Troubleshooting: If the mousse is too thick, add a tablespoon or two of milk to thin it out.
Want to level up this recipe?
High-quality chocolate bar — Using a good-quality chocolate bar makes all the difference in this recipe. → Check price on Amazon
Crispy Chocolate Mousse Brownies – Better Than Takeout
Ingredients
Main Ingredients
- Dark chocolate
- Butter
- Sugar
- Eggs
- All-purpose flour
- Cocoa powder
- Heavy cream
- Vanilla extract
Seasonings
- Salt
- Vanilla extract
Optional Toppings
- Powdered sugar
- Fresh berries
Instructions
- Melt chocolate and butter: In a microwave-safe bowl, combine dark chocolate and butter. Heat in 30-second intervals, stirring between each, until smooth.
- Mix dry ingredients: In a separate bowl, whisk together sugar, eggs, flour, cocoa powder, and salt.
- Combine ingredients: Add the chocolate mixture to the dry ingredients and mix until combined.
- Bake: Pour the batter into a greased 8×8-inch pan and bake at 350°F (180°C) for 20-25 minutes.
- Prepare mousse: In a separate bowl, whip heavy cream and vanilla extract until stiff peaks form. Gently fold in melted chocolate.
- Assemble: Spread the mousse over the cooled brownies and refrigerate for at least 2 hours before serving.
Notes
- Chef tip: For a fudgier brownie, reduce baking time to 18-20 minutes.
- Best substitution: Substitute heavy cream with full-fat canned coconut milk for a dairy-free version.
- Make-ahead: Prepare the batter and mousse separately a day ahead, then assemble and refrigerate just before serving.
- Scaling: This recipe can be doubled and baked in a 9×13-inch pan.
- Troubleshooting: If the mousse is too thick, add a tablespoon or two of milk to thin it out.
Storage
- Fridge: Store in an airtight container in the refrigerator for up to 5 days.
- Freezer: Not recommended for freezing.
- Oven reheat: Not necessary, serve chilled.
- Microwave reheat: Not recommended, as it may melt the mousse.
- Make ahead: Can be made up to 1 day ahead and stored in the refrigerator.
Nutrition Per Serving
- Calories: 420
- Protein: 5g
- Fat: 28g
- Carbs: 45g
- Fiber: 3g
- Sugar: 32g
- Sodium: 120mg
- Cholesterol: 100mg
- Sat. Fat: 16g
Nutritional values are estimates only. Actual values may vary by brand and portion size.
Crispy Chocolate Mousse Brownies – Better Than Takeout FAQs
Yes, prepare the batter and mousse separately a day ahead, then assemble and refrigerate just before serving.
This could be due to overmixing or using cold ingredients. Make sure your heavy cream is very cold and mix just until combined.
Not recommended, as freezing can cause the mousse to separate.
No, this recipe is not suitable for the air fryer.
Full-fat canned coconut milk can be used as a dairy-free substitute.
A Warm Final Note
I can’t wait for you to try Crispy Chocolate Mousse Brownies – Better Than Takeout and see how effortlessly it comes together. When you make it, pop back here and leave a rating or share how it turned out — I love hearing from you!